
Tiny in size, big in taste. And good for the planet, to boot.
Sarah Vail showed off her trays of spicy salad microgreens, growing in a sunny alcove on the second floor of her West Tisbury home. It was mid-February.
“It’s fresh, and I’m growing it,” she crowed, pointing to the tiny leafed microgreens about two inches tall that would be ready for clipping in a day or two. “I pick what I need, and it doesn’t go bad.”
A family and consumer science teacher in Edgartown who loves to cook and eat healthy food, Vail said she was surprised at how easy microgreens are to grow and use in the kitchen. “It’s fun — it’s my new thing,” she said.
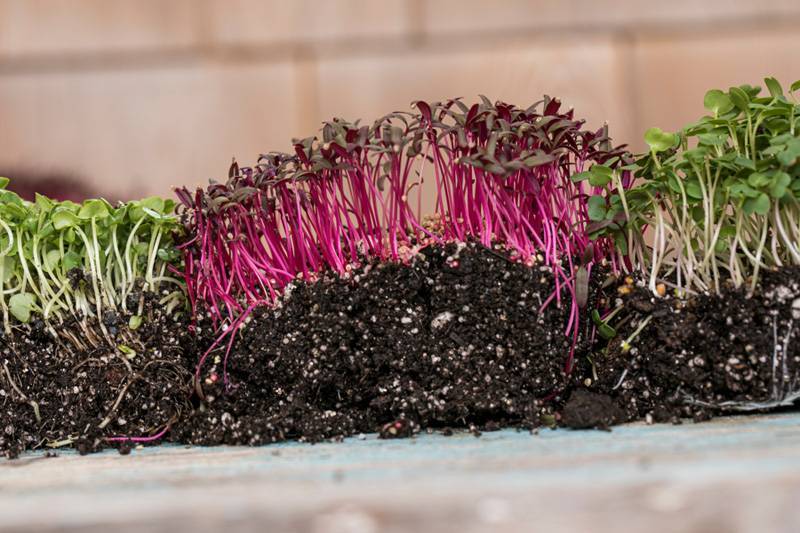
There’s a lot to love about these fluffy little greens, including their small footprint, requiring fewer resources than traditionally farmed food — much less soil, 95 percent less water, and no herbicides, pesticides, or fertilizer. —Photo by Randi Baird
She’s not alone. Microgreens might be having a kale moment. Seed catalogs now feature microgreen sections; you’ll find them at farmers markets, and supermarkets are selling them too. There’s a lot to love about these fluffy little greens, including their small footprint, requiring fewer resources than traditionally farmed food — much less soil, 95 percent less water, and no herbicides, pesticides, or fertilizer.
Microgreens could be considered a model of sustainability, because they can be grown in small spaces indoors, year-round, in cities, in greenhouses, and in homes.
Microgreens sprout from regular vegetable seeds, but are clipped for consumption at only a few weeks old, generally seven to 14 days. The visual appeal, wonderful texture, nice flavors, and high nutritional value make them a hit in the kitchen. The dozens of varieties range from an attractive and diminutive purple-stem red cabbage to dark green collards, and from mild-tasting broccoli microgreens to mustards that taste like wasabi. And there’s plenty more to experiment with: microgreen basil to clip and toss on pasta, chia greens, even Asian varieties like napa cabbage or pac choi.
I had guessed growing microgreens would be fairly easy, and probably cheaper than buying them all the time. But I’m a bit of a procrastinator. I’ve thought about raising chickens, and purchasing or building a coop — for years. During the beekeeping craze, I bought two bee boxes. I just sold them at my yard sale when I recently moved. Seeing Sarah’s success was the push I needed. I ordered some seeds! To my doorstep came my three favorites (which I usually buy in the market) — broccoli, arugula, and pea shoot microgreens — and a few small seed packets to experiment with, including chives and red amaranth. I don’t remember ordering popcorn shoots — literally popcorn kernels to start — but what the heck?
Each day, I lifted the covers to mist and moisten, and in just two days, the broccoli and arugula had started to grow! I uncovered the trays and moved them to the sunniest spot in the house.
I put the recommended inch or two of moistened soil in a mix of containers — a few plastic boxes (save those strawberry or salad containers), a disposable pie plate, and a few shallow germination trays. Each microgreen has its own rate of growth, so it’s best to plant one variety to a container. A fine potting or seedling soil is recommended. After leveling the soil and pressing it down slightly, I scattered the seeds densely on top, misted them with water from a spray bottle, and then covered the containers to keep dark until germination.
Each day, I lifted the covers to mist and moisten, and in just two days, the broccoli and arugula had started to grow! I uncovered the trays and moved them to the sunniest spot in the house. In about seven to nine days — less than two weeks — all were ready to harvest and test out in the kitchen. If you have fluorescent or LED grow lights for seedlings, go ahead and use those, as most commercial microgreen growers do. Water each day as they grow, since soil is shallow and can dry out. For the most part, the microgreens do not regrow after being clipped (with exception of pea shoots and wheatgrass), so recycle or reuse the soil as well as the containers (after washing) for next batches to have a continuous supply.
And then appreciate the bounty from your own shelf – all year long.
How to Grow
These online videos give step-by-step growing details by experts.
- “Seven Easy Steps for Homegrown Microgreens” from Sow True Seeds, YouTube video (8 min.)
- “How to Grow Microgreens” from “Ask This Old House”; Tim Smith of We Grow Microgreens explains his process (6 min.)
- “How To Grow Microgreens Start to Finish,” from Kevin Espiritu of Epic Gardening, detailed YouTube video (41 min.)
Buying Seeds
Seeds for microgreens are the very same as regular vegetables just harvested early and packaged with larger amounts because you plant them more densely. These seed companies have decent microgreen sections.
- Johnny’s Seeds, employee-owned/organic, has one of the better selections of microgreens seeds.
- High Mowing, also organic.
- True Leaf Market, non-GMO and heirlooms.
Local Sources to Buy Microgreens (already grown)
- Mermaid Farm, 9 Middle Road, Chilmark, offers the best deal locally for pea shoot microgreens.
- Island Grown Farm includes them in its CSA, Mobile Market, and stocks Cronig’s Market.
- Morning Glory Farm, 120 Meshacket Road, Edgartown, continues to have a nice variety of microgreens in two-ounce containers.
- Ghost Island Farm, State Road, West Tisbury, sells microgreens and pea shoots at the farm stand and Cronig’s.
- Deep Roots Island Organics, 844 State Rd, West Tisbury, farm stand (across from Ag Hall) sells microgreens and edible flowers, also to restaurants and Cronig’s.
Kitchen Uses for Microgreens
Microgreens may be tiny in size, but everything else about them is big: their nutritional impact; the myriad of colors, flavors, and textures; and their surprising versatility in the kitchen.
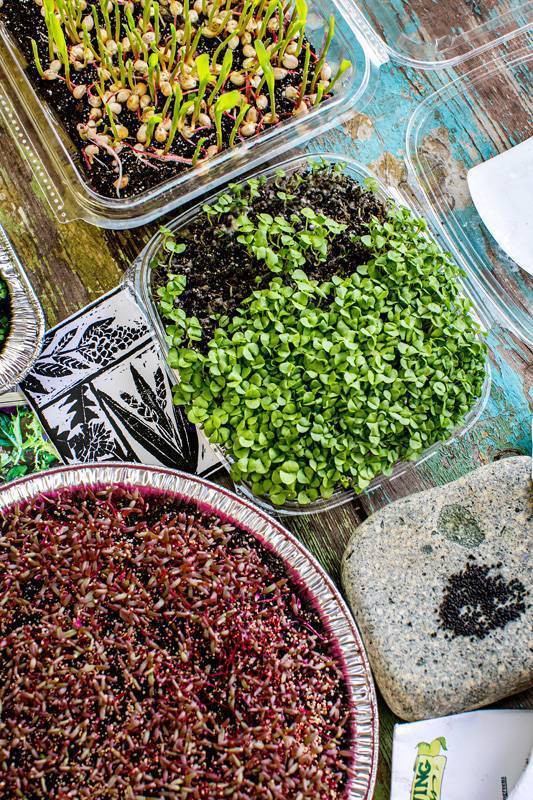
For the most part, the microgreens do not regrow after being clipped, so recycle or reuse the soil as well as the containers (after washing) for next batches to have a continuous supply. —Photo by Randi Baird
The wonderful flavors of these small, tender leaves match the adult plants, though in subtler ways. Pea shoot microgreens, for example, offer a hint of pea flavor. If you are not a fan of kale or broccoli, you might find the microgreen versions pleasantly milder and a lot more tender. Micro arugula is still a bit peppery, but that’s perfect to bump up potato salads and other, blander foods like beans and pasta. And then there are some really spicy microgreens, ruby mustards and various radishes. Did I mention there’s no chopping or prep work, aside from gently rinsing in a salad spinner to remove any bits of clinging soil?
While chefs first experimented with microgreens as fancy garnishes, they really weren’t available in supermarkets for home cooks. We had those hippie bean sprouts. The difference? Sprouts germinate in water, leaving the partial seed still attached and a tangled mess of stems, while microgreens grow most often in soil (and sometimes hydroponically) before being snipped after seven to 14 days, with delicate, beautiful green or red leaves and tender stems for consumption.
Gearing up for summer, my own favorite uses include greening up grain, pasta, and potato salads with handfuls of microgreens, like the arugula salad with strawberries you see here.
This winter I made a striking combination of shaved fennel, rounds of orange, and about a cup of microgreens. It took less than 10 minutes. I’m already thinking of slices of summer peaches, microgreens, and creamy Burrata cheese. Simple!
Tim Smith of We Grow Microgreens in Boston, who sells at the Wayland Winter Farmers Market, finds lots of other uses at home. “I like the daikon radish in omelets; the sunflower in green smoothies,” he says. “I like amaranth in salad with avocado — the contrast is very beautiful. And pea shoots are tasty wilted into a stir-fry.”
Microgreens also make good toppings for grain bowls, pho and ramen soups, and curry dishes. I’ve used microgreens or pea shoots instead of lettuce in fresh spring rolls, and mixed them with shredded chicken and slivered veggies for chicken salad combinations. Many stuff them into sandwiches and wraps.
When you have microgreens in the fridge, don’t forget you have the same tool as chefs for beautiful garnishes, atop crispy flounder or a chilled cucumber soup.
Microgreen Recipes
Looking for more ideas on what to do with your microgreens? Check out some of these recipes from author Catherine Walthers.